
Want to change your wifi on the Wyze security camera, and unsure how to do it? Don’t worry! It is easier than you think. Whether you are facing issues connecting your device to wifi or setting up a brand-new camera, knowing How To Connect Wyze Camera To WiFi is essential. Indeed, getting your device online is pivotal for its optimal functioning.
Additionally, it is essential for re-establishing your connection after a network change or resetting your device. So, whenever you reset your device or change the network, you need to connect to a new wifi, following the initial setup. This guide elaborates on How To Connect Wyze Camera To New WiFi step-by-step. Stay focused and read till the end!
Key Considerations Before Wyze Camera Wi-Fi Connectivity
However, to ensure a smooth Wyze camera wifi setup, it is essential to consider a few key factors. Before diving into How To Connect Wyze Camera To WiFi, you must ensure, you have:
- Stable 2.4GHz Wi-Fi Network
- Good Signal Strength
- Accurate Wi-Fi Credentials
- Mobile Phone
- Wyze App (latest version)
- Valid Login Details
- Enabled Location and Other Permissions
- Power source, etc.
Thus, fulfilling such minor yet significant needs can lead to time savings and annoyance during the installation process.
Here is How To Connect Wyze Camera To WiFi Effortlessly.
To make the most of your Wyze camera, the first and arguably most important step is to connect it to Wi-Fi. Nonetheless, this is an easy process that will only take you a few minutes. So, get ready to access your Wyze camera online with a wireless connection in just a few steps, as follows.
- First of all, you need to install the latest version of the Wyze App for your Android/iOS device.

- Now, join the home wifi on your mobile phone.
- Then, open the app on your phone and log in.
- Further, add your device to the app and follow the instructions to link it with your account.
- Select your camera model and tap Next.
- Now, disconnect the camera from the outlet and base, and then tap on ‘Setup’.
- Then, you hear a sound, and then tap ‘I heard, Ready to Connect’ in the app.
- Select the 2.4 GHz wifi network you’d like to connect to and enter its password.
- Next, scan the QR code with the smartphone camera to go online.
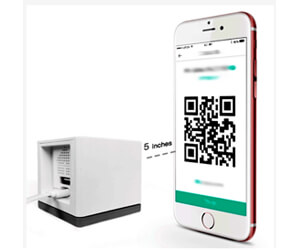
- After you get a message of “QR Code Scanned, please wait”, hit “Setup Completed”.
- At this point, rename your Wyze security camera by doing this.
- Finally, choose a name for your camera and click on “Finish”.
- Finally, you have learned How To Connect Wyze Camera To WiFi on the app.
Learn How To Connect Wyze Camera To New WiFi at Home?
When you are changing Wi-Fi networks, you will have to reset your Wyze camera. Regrettably, this is not possible with Wyze cameras, as one can not directly switch between Wi-Fi bands using the app. To reset and reconnect:
- First, locate the Setup button on your camera.
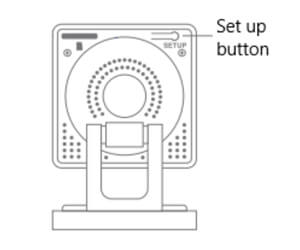
- Then, press & hold it till you hear the message “Ready to connect”.
- Next, delete the device from the Wyze app.
- Further, log in to your Wyze account again.
- Once the reset is completed, you may join the new Wi-Fi by the same procedure as your initial installation.
- Scan the QR code, fill in the credentials of the 2.4GHz Wi-Fi network, and complete the on-screen setup in the application.
Final Words
Overall, knowing How To Connect Wyze Camera To WiFi, is an important process that you must do when you want your Wyze camera to be fully operational. Whether you are configuring it or changing networks, doing the proper process guarantees its effective functioning. So, follow this guide to get your device online in moments.